使用Dlib、PyQt搭建人脸识别系统
1、软硬件需求
开发及实验平台(windows也是一样的)
Ubuntu 16.04.1 x64;内核版本:4.8.0-36-generic软件配置
数据库: Python 模块Sqlite3版本:3.11.0
Python版本:3.5
PyQt5版本:5.10.1
Python模块Dlib版本:19.9.0
Python模块Opencv版本:3.4.0.12
Python 模块face-recognition版本:1.2.2
Python模块 numpy版本:1.14.2
Python模块 pandas版本:0.22.0硬件
测试机:thinkpad E440
摄像头:电脑自带720p HD摄像头
注意:**所有软件配置中python模块的安装都可以使用1
2
3
4
5
6
7
8
9
10
11
12
13
14
15
16
17
18
19
20
21
22
23
24
25
26
27
28
29
30
31
32
33
34
35
36
37
38
39
40
41
42
43
44
45
46
47
48
49
50
51
52
53
54
55
56
57
58
59
60
61
62
63
64
65
66
67
68
69
70
71
72
73
74
75
76
77
78
79
80
81
82
83
84
85
86
87
88
89
90
91
92
93
94
95
96
97
98
99
100
101
102
103
104
## 2、什么是PyQt

PyQt是一个图形化软件开发的库,基于python,使用方便而且功能完善。

## 3、人脸识别功能的实现

### 如何识别人脸

简单的识别人脸可以借助face-recognition这个python模块中的接口实现,这个模块内部调用了Dlib来实现人脸识别,但是它对Dlib的使用比较粗糙,有很多可以我们自由改进。在进阶方案中我们可以自己来修改face-recognition的源码达到改善识别效果的目的。
下面用一个[例子][4]来介绍face-recognition的使用:
```python
import face_recognition
import cv2

# 开启摄像头
video_capture = cv2.VideoCapture(0)

# 载入一张已知的照片作为识别的先验参照,不然没有办法分辨谁是谁,这张照片可以放在当前文件夹中
obama_image = face_recognition.load_image_file("已知人脸的图片.jpg")
# 使用face_recognition模块把已知人脸图片的编码取出来
face_encoding1 = face_recognition.face_encodings(obama_image)[0]

# 载入第二张已知的照片作为识别的先验参照,这张照片可以放在当前文件夹中
biden_image = face_recognition.load_image_file("已知人脸的图片2.jpg")
# 使用face_recognition模块把已知人脸图片的编码取出来,
face_encoding2 = face_recognition.face_encodings(biden_image)[0]

# 用列表把已经编码的已知人脸特征编码存起来
known_face_encodings = [
    face_encoding1,
    face_encoding2
]
# 把名字按顺序存起来
known_face_names = [
    "名字1",
    "名字2"
]

# 准备一些变量
face_locations = []
face_encodings = []
face_names = []
process_this_frame = True

while True:
    # 获取一帧摄像头图像
    ret, frame = video_capture.read()

    # 将图像缩小为原来的1/4这样处理起来比较快
    small_frame = cv2.resize(frame, (0, 0), fx=0.25, fy=0.25)

    # 这行代码将图像从BGR(opencv当前从摄像头获取的图片,以这种颜色格式存储着)转化为RGB(等会用到的颜色是这种颜色)
    rgb_small_frame = small_frame[:, :, ::-1]

    # 只处理process_this_frame = True的帧,减少计算量
    if process_this_frame:
        # 找到当前摄像头中所有的人脸的位置,把这些位置保存起来
        face_locations = face_recognition.face_locations(rgb_small_frame)
        # 将找到的人脸都编码为人脸特征编码
        face_encodings = face_recognition.face_encodings(rgb_small_frame, face_locations)

        face_names = []
        # 查找摄像头中的人脸与已知人脸中的哪一个最为相像
        for face_encoding in face_encodings:
            matches = face_recognition.compare_faces(known_face_encodings, face_encoding)
            name = "Unknown"

            # 使用所有匹配的人脸中排序最先的那一个作为身份
            if True in matches:
                first_match_index = matches.index(True)
                name = known_face_names[first_match_index]

            face_names.append(name)

    process_this_frame = not process_this_frame


    # 将识别结果在展示在一个窗口中
    for (top, right, bottom, left), name in zip(face_locations, face_names):
        # 将人脸位置放大四倍,因为之前缩小了
        top *= 4
        right *= 4
        bottom *= 4
        left *= 4

        # 用刚才得到的人脸位置在图像中画出方框框住人脸
        cv2.rectangle(frame, (left, top), (right, bottom), (0, 0, 255), 2)

        # 在人脸框的下面画上一个方框,放识别出来的名字
        cv2.rectangle(frame, (left, bottom - 35), (right, bottom), (0, 0, 255), cv2.FILLED)
        font = cv2.FONT_HERSHEY_DUPLEX
        cv2.putText(frame, name, (left + 6, bottom - 6), font, 1.0, (255, 255, 255), 1)

    # 显示出身份识别结果
    cv2.imshow('Video', frame)

    # 设置按'q'建就会退出
    if cv2.waitKey(1) & 0xFF == ord('q'):
        break

# 释放摄像头
video_capture.release()
cv2.destroyAllWindows()
通过以上的代码可以了解如何使用face-recognition这一模块来进行人脸识别。
使用PyQt
(1)设计PyQt界面
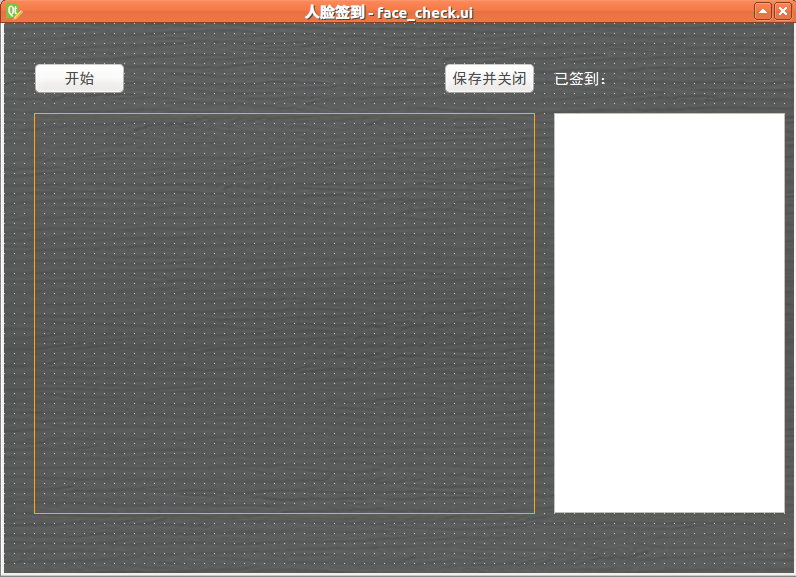
Qt5界面可以使用Qt designer这一工具进行设计,但是PyQt5的界面有没有简便的工具呢。事实上PyQt5也使用Qt designer这一工具,在设计完成之后,可以使用pyuic工具转换为python可以使用的界面文件
如图所示为我用Qt designer设计的一个界面.ui文件,使用如下的命令将界面源码转换为.py格式的PyQt可以使用的界面文件face_check.py
1 | pyuic -x -o face_check.py face_check.py |
(2)为界面添加交互
但是有了界面之后,人机交互应该如何实现呢,这需要涉及到PyQt的交互机制,下面的代码展示了为“开始”按钮增加一个点击事件
1 | __author__ = 'Zhang Zhe' |
PyQt中提供了和Qt一样的信号槽机制。对于按钮来说,其默认有一个clicked事件可以连接